Google Cardboard and Photospheres
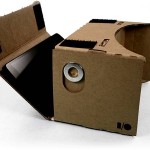 After Google Cardboard was announced at I/O back in June, we bought one for a prize giveaway at BrainBlast. As soon as it came, everyone in my office started experimenting with it and was immediately fascinated. For those who aren’t familiar, Google Cardboard is a cardboard cutout with two lenses, a neodymium magnet that acts as a trigger for input, and an empty space for your smartphone. With iOS or Android apps that provide a stereoscopic (side-by-side picture) view, looking through the lenses provides an easy-to-implement but very effective virtual reality experience.
Smartphone-based virtual reality has been around for awhile in the form of Durovis Dive and other do-it-yourself headsets, though I’d never really paid much attention, since the headsets were still fairly expensive. But after seeing Google Cardboard and realizing how inexpensive a virtual reality headset could be, I found myself thinking about the numerous possibilities it could bring for our teachers and students. For starters, the Cardboard app and Chrome Experiments released by Google have plenty to engage the imagination: navigating through Google Earth, seeing 360-degree videos, an animated short, and watching and exploring the virtual tour.
There’s a number of places to get a Google Cardboard headset, and Google lists a few on their web site. I can personally vouch for the quality of the Unofficial Cardboard headset at https://www.unofficialcardboard.com/products and you can buy a version that’s already put together for you, but if you’re crafty you can buy an unassembled kit and put it together yourself (it’s actually not that difficult).
The cheapest I’ve been able to find is at Tinydeal: http://www.tinydeal.com/diy-google-cardboard-vr-3d-glasses-for-iphone-samsung-cellphone-p-135220.html The price on this bounces around a bit, but usually it’s between $2.50 and $3.50. You can check back later and see if it’s cheaper, but I’ve bought 10 headsets off Tinydeal and they’re decent enough, but the magnets aren’t very strong so if you’re using it with an app it might not always detect the input. The eyes seem like they might be just slightly too far apart, too.
One of the coolest things that modern smartphones can do is capture photospheres using the Google Camera app for Android or the Photo Sphere Camera app for iOS. It’s similar to capturing a panorama with your smartphone, except you also capture photos above and below. The best way to take a good photosphere is to try to keep the phone in one place and pivot yourself around it as you snap pictures at every angle. If you have a tripod with a handle that can rotate it in every angle, that’s ideal. Otherwise, resting your smartphone on an object like the edge of a table or chair can give you fairly good results if you have trouble keeping your camera in the same position. Check out the collection of photospheres others have made on Sphereshare and the G+ Photo Sphere Community for some examples.
I created my own photosphere uploading and sharing web app (best viewed in Chrome) that you can use to easily share your photospheres, and view them with a Google Cardboard headset via the browser. You can also embed your photospheres as seen below. Try clicking and dragging to scroll around if you’re on a desktop. If you’re on a phone, you can rotate the scene by moving your device around. Click the icon in the bottom left to toggle between standard and stereoscopic/VR mode.
Upload or import your own photospheres at http://viewer.spherecast.org and view them in Google Cardboard.

Thanks a lot for sharing, I have an iPhone but I had no way of viewing my photospheres on the Google Cardboard lenses
Regards
Hector
I’m glad you like it. I’m also working on another site that will let you upload and keep collections of photospheres online for easy viewing and sharing as a VR gallery, so it’s not just a bunch of disconnected URLs. I don’t typically have much of a chance to test this with iPhones, so it’s good to have that feedback. Out of curiosity, which iPhone are you using, and are you using Safari?
Thanks Justin, I’m using an iPhone6 (small version)
Actually, I thought about building an iPhone app with your web app. Have you thought about it?
I haven’t really advertised this much yet, but here’s some more information on the web app I mentioned: http://spherecast.org You’ll be able to upload photospheres galleries and even add interactions and media in your scenes.
We’ll be releasing a couple demos sometime this month or early February, and should have a beta ready around summer. The goal is to create the web app first, since it’s the most ubiquitous platform, then create an iPhone and Android app immediately after. So an iPhone app is in the works, but might not be ready for awhile. I think it’s a fantastic idea, though, and we definitely more Google Cardboard apps for iOS devices.
hi Justin
how far away is the Ap for an iphone? Im looking for an photosphere option that works for both iphone and android
Hi, Abi. You can use the web viewer (http://viewer.spherecast.org) right now to view photospheres on an iPhone with iOS 8+. The more polished app that lets you chain scenes and add interactions will be ready for beta sometime this summer. Since the web app is more ubiquitous, the plan is to focus on that right now, and dedicated Android and iPhone apps likely won’t even be started until toward the end of the year, at the earliest.
This is fantastic! Thanks Justin. I would love to discuss a project I’m working on now. This would be fantastic for it. Thanks for making stuff!
Abi,
You mention “stereoscopic” in connection with photospheres, which, AFAICT, are always single images (not stereoscopic). Are you actually doing stereo vision with a separate photosphere for each eye?
I would like to do that, and am currently trying to figure out if it’s already out there.
You’re right, it’s not true stereoscopy, but an attempt to fake the feeling of it by slightly shifting the view for each eye. You might be able to produce a true effect if you can take two images at the same type with a 360 camera, but then you’d have to deal with the inevitable and inconsistent gap to the left and right, depending on which side you’re viewing. Perhaps you could simply “fill in the blanks” in one image with parts from the opposing image, if that makes sense, and get at least presentable results that way. It could be an interesting experiment, at any rate.
Justin,
Apparently this guy is going it.. I just signed up to be a beta tester in order to download it, but haven’t had time yet to check it out yet.
https://plus.google.com/_/notifications/emlink?emr=09314859280215741290&emid=CNnIwJb7kMUCFYf7NAodOEwAlw&path=%2Fcommunities%2F110296186842409327827&dt=1429947936458&ub=SQUARE_MEMBERSHIP_APPROVED
This spherecast viewer works beautifully! I have been using to embed pictures on my website and for photography reasons, am trying to figure out how to eliminate 2 of the 3 bottom icons (for download and embed code). Obviously trying to keep cardboard and full screen icons, but trying to declutter the rest of the pic. Would like to just post your spherecast website below the photosphere pics. Any ideas on how to do that? Thanks again.
I’m glad you like it and have found it useful! I made some tweaks, and you can now get rid of those two icons by adding /minimal in the URL of your embed code.
Here’s an example:
<iframe src=”http://sphcst.com/0emo3/embed/minimal” width=”640″ height=”320″ frameborder=”0″ allowfullscreen />
Wow, simple. And as always, looks great! Thanks Justin!
Hi Justin,
I’m wondering if you have any insight on getting a 360 degree video into a cardboard viewer? Is it possible you’d be able to create the same kind of photo uploader but for video?
Thanks in advance!
Jeff
Hi, Jeff. The only reason I haven’t added that into the viewer right off is due to bandwidth concerns, but it’s definitely in the works for our future Spherecast product currently in development. You can also use apps like this one for playing 360-degree videos you’ve downloaded, too: https://play.google.com/store/apps/details?id=com.Cmoar.Cmoar360Player&hl=en
Thanks, Justin!
Just to clarify, I used a Ricoh Theta camera to shoot some 360 degree video that I’m trying to put into a VR environment using cardboard. Does that app allow me to do something like that? Take my own video and set it up for a headset?
If not, do you know any other ways of doing so?
Thanks again!
Yes, it will let you load any 360 videos you’ve recorded or downloaded. I know the video resolution of the Ricoh Theta is at the lower end of what’s generally considered “acceptable” for VR viewing. But if you’re willing to share, I’d love to hear your feedback after trying it, and if you feel like it still offers a suitable Cardboard viewing experience.
Yeah, it’s definitely not the best resolution, but with a little color correction and other post-production techniques it improves.
Do you know of any iOS comparable apps to Cmoar?
Thanks again, really appreciate the assistance.
Also wondering if you know of a good way to create a similar experience (for cardboard viewing) in web programming? I’d love to be able to send someone a link.
Justin, keep up the great work you are doing on your project. I’m a fan of your minimalist online viewer, as it works across devices and there is no app to download.
I’ve been serving photo spheres through QR codes linked to your service. Very handy if you plan a printed poster.
Something you might want to consider is a URL parameter to define which default view to serve, either side-by-side or full screen mode. In this way, if you know your audience will not have Cardboards available, you can program the link to default to full screen on their devices.
Thanks again for your efforts!
Thank you!
Any progress on the Spherecast.org product? I teach kids and have a stack of Cardboard viewers. I would love to broadcast the photospheres and control when we, as a class, can move on to the next one.
If you could suggest a method that works, I would be in your debt.
Yes! Within the next few weeks, there will be a new photosphere management tool available for you to use with your students. Soon after that, we’ll be adding slideshow creation to it.
Also, please feel free to contact me at [email protected] and maybe I can help come up with something sooner for you right now. I’d love to hear more about what kind of VR experiences you’re trying to do with your students.
Hi Justin,
I’m a tech coordinator from Green Bay, WI. We just discovered your Photosphere upload tool. Thank you for creating this! I’m actually presenting about VR at the Midwest Google Summit today and just shared how we used your tool to build our wiscoVR.org site. You rock!
Jamie Averbeck
Instructional Tech Coordinator
Ashwaubenon School District
Thank you, Jamie! I’m glad you found some use for it, and I like the wiscoVR.org site! I’m happy to see VR tours being used more and more in the education system.